|
|
|
|
|
|
|
|
|
 #g6 Bilder mit Pixel modelieren #g6 Bilder mit Pixel modelieren
Viele mit dem Computer gemalte Bilder, sind zu genau, die Linien sind zu präzise, und die Bilder maschinenhaft. Da wir aber mit dem
Rechner Bilder schaffen wollen, die wie gemalt aussehen, muss uns etwas einfallen. Hier ist eine Lösung für dieses Problem: Die Modellierung von Bildern in einer mit Pixeln
gefüllten Datei. Normalerweise, wird beim Malen eines Bildes dessen Datei langsam mit den gemalten Pixeln aufgefüllt. Im Gegensatz dazu, füllen wir vor dem Beginn des Malens,
eine leere Datei mit vielen Pixeln. Diese Pixel, schieben wir nun so, das ein Bild entsteht. Wir malen also nicht mit einem Pinsel, sondern mit einem Radierer und einem Wischwerkzeug
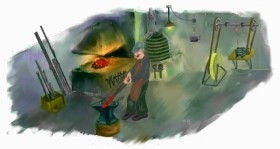
oder Blender. Das Beispielsbild eines Kruges, gemalt mit dem Programm “Corel PainterX” zeigt in Fig.8 wie es geht:
- #1 Auffüllen einer Datei mit dem Werkzeug “Pastellfarbe” , bis man keine Linien mehr sieht. ( Fast jedes Malwerkzeug außer “ Füllen , könnte
verwendet werden).
- #2 Mit dem Werkzeug “ Schärfen die Pixel sichtbar machen.
- #3 Mit einem Radierer ein Grundbild auf die Pixel malen und mit dem Wischwerkzeug ein plastisches Bild
erzeugen. (Die Pixel lassen sich leicht hin und herschieben)
- #4 Das Bild fein überarbeiten, eventuell mit Farbstift.
- #5 Ausschneiden
- #6 Colorieren und als Objekt in ein Bild einsetzen.
Das diese Art von “ Malerei” auch mit anderen Programmen funktioniert zeigt die Fig.9, in der mit dem Programm “Photoimpact”, ein Hut
modelliert wurde. Hier wurde die Datei mit den Pixeln eines Vielfarbenstift gefüllt. #1. Die Bilder #2-13 zeigen den Weg mit dem Radierer und dem Wischer.
Ein Beispiel für ein Bild, das in dieser Technik gemalt wurde ist Fig.10. Der Malweg in diesem Bild ist wie folgt:
- Auffüllen einer Datei mit Pixeln, das heißt zuerst Vollsprühen unter Verwendung einer “Sprühdose” und danach das ganze Bild “Schärfen”.
- Malen des Hintergrundes mit Ölfarben.(Twisted Brush; “Textured Oil”; das Malen auf den geschärften Pixeln geht problemlos wie mit echten
dickflüssigen Ölfarben
- Skizzieren des Motorrades mit einem Radierer und Stift).
- Malen des Motorrades mit “Textured Oil” und leichtes Einebnen durch einen “Blender”.(Verwischen)
- Skizzieren des Mädchens durch einen Radierer und ausschneiden der einzelnen Glieder und diese als fliegende Objekte im Bild belassen. Nun
Optimierung der Sitzposition des Mädchens durch verändern der Fuss-Leib und Armwinkel. Danach wieder einfügen der Mädchenobjekte und mit Ölfarben bemalen. Die Ölfarben
auf die Pixeldatei machen es möglich, die Kleiderfalten einfach hinzuschmieren.
- Einfügen von Motorrad und Mädchen in das Bild #2 und reparieren der Kanten mit Ölfarbe und Blender.
|
|
|
|
#g7Abdunkeln von Bildteilen
Um ganze Bildflächen gegenüber dem übrigen Bild abzudunkeln gibt es mehrere Möglichkeiten :
- Mit dem Werkzeug “ BURN “ und viel Arbeit alles dunkel zeichnen.
- Mit dem Werkzeug Lasso den abzudunkelnden Teil kennzeichnen und danach die Helligkeit zurückdrehen.
- Mit dem Werkzeug Lasso den abzudunkelnden Teil kennzeichnen, kopieren und als “Multiply Objekt” (oder
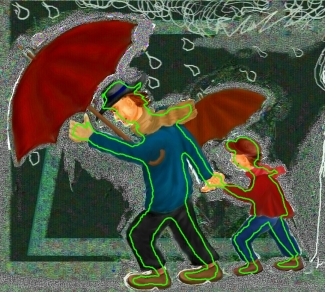
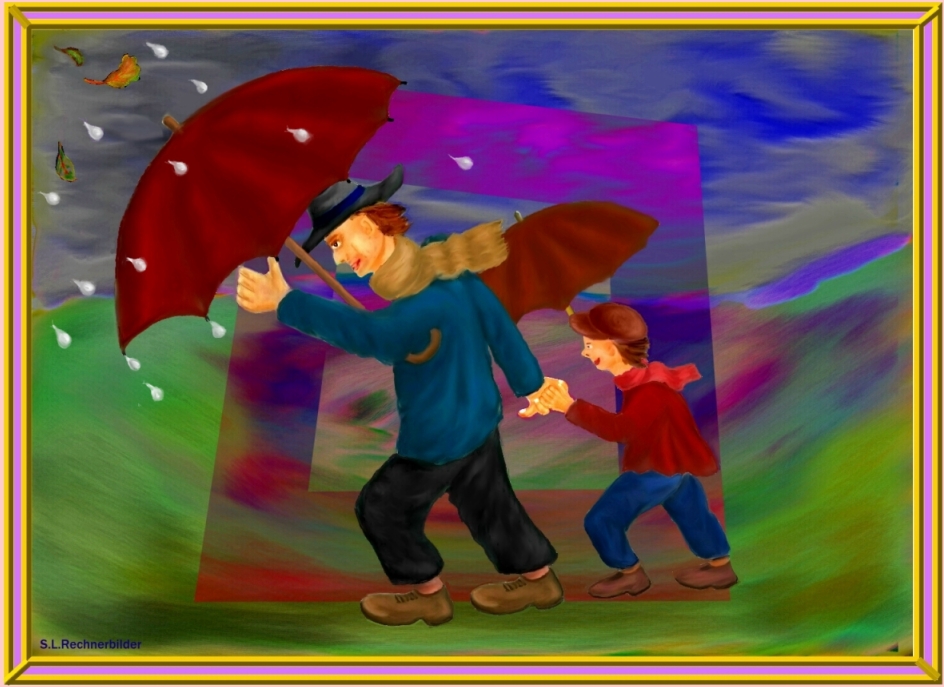
Layer) der gleichen Stelle überlagern. Fig.1 zeigt ein Beispiel dieser Möglichkeit .
- #1 Das Innere der Vase samt den Blumenstengeln soll abgedunkelt werden.
- #2 Objekt ausschneiden.
- #3 Mit Multiply wieder addieren.
- #4 Die Ränder mit dem Wischwerkzeug bearbeiten.
#7 Fig.1 Abdunkeln mit Multiply
|
|
|
|
 |
|
|
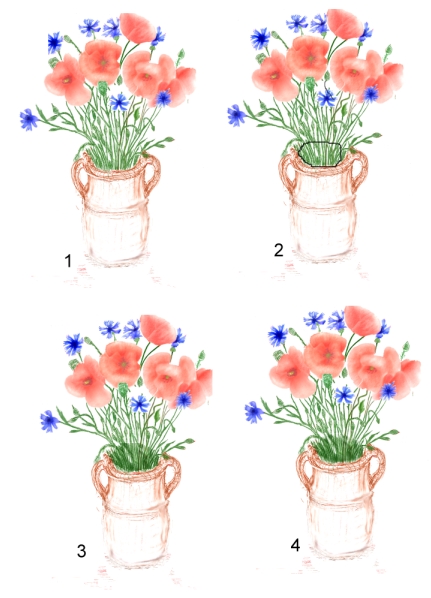
#g8 Abgrenzen mit Linien
Oft entstehen beim Malen unerwünschte Flatterränder, die man später mit einem ““Radierer” mühsam begradigen muss. Diese
Arbeit kann man sich sparen, wenn man die Ränder mit eingebrannten Linien begradigt. Das geht leicht und blitzschnell. Als Beispiel dient die Vase von Fig.1. In #1 sieht man den
Flatterrand der Vase , den man in einem wesentlich vergrößerten Bild einebnen müsste. In #2 wurde eine Linie mit dem Werkzeug “ Spline” als Objekt auf den Rand der Vase
gelegt. In #3 wurde die Farbe der Linie auf weiß geändert und die Linie eingebrannt. Nun ist der Flatterrand weg.
|
|
|
|
#g9 Rechnermalerei mit Differenzobjekten
Durch Differenzbildung von Objekten oder Lagen, können viele künstlerische Effekte, die mit Pinsel nur schwer zu malen sind, erzielt werden.
Um dies zu erreichen müssen die Variablen der Differenzbildung , vor allem die Transparenz, verstellt werden können. Auf diese Weise, kann man Bilder völlig ohne Stift und Pinsel malen. Ein
Beispiel, zeigt wie das geht. In Fig.1 #1 ist ein einfaches Bild aus lauter Kästchen dargestellt. Wenn wir das gleiche Bild darüberlegen, wird bei Differenzüberlagerung ein völlig schwarzes Bild
entstehen, den beide Bilder löschen sich aus. Durch Bildverschiebung, kann man wie #2 zeigt, die Ränder hervorheben. Wenn man #1 mit einem Schmierer bearbeitet, dann entsteht das Bild #3. Überlagert man
#1 und #3 entsteht ein neues durchmischtes Bild von #4. Je nach Eigenschaft der Differenzbildung entsteht eine andere Durchmischung #5. In der Veränderung der Durchmischung, liegt die Kunst,
Differenzbilder zu erzeugen. Verwässert man das Bild #1 so entsteht ein Bild wie #6. Bei richtiger Wahl der Differenzparameter zerfließt alles #7. In einem gemalten Bild, kann man auf diese Weise
einzelne Teile gezielt verändern, indem man dieses Teil ausschneidet, verändert und als Differenzbild wieder überlagert. (Die Bilder wurden mit dem Werkzeug “Tonmap” von Photoimpact 6.0 gemacht.) Dabei ist es wichtig zu wissen, was mit den Farben passiert, denn die RBG-Farben Mischgesetze gelten bei Differenzbildung nicht. Deswegen, habe
ich die Differenzfarbenskala für T=0 von Fig.2 gemacht. Wir sehen hier, das die gleichen Farben immer schwarz ergeben. Zum Beispiel ergibt weiß minus blau, (ganz unten rechts,),) immer gelb, grün
minus gelb gibt rot.
|
|
|
|
|
|
|
|
|
|
|
#6 Fig.8
Modelieren mit “Corel-Painter X”
Modeling using “Corel-Painter X”
#6 Fig.9
Modelieren mit “Photo Impact”
Modeling using “Photo Impact”
#6 Fig.10
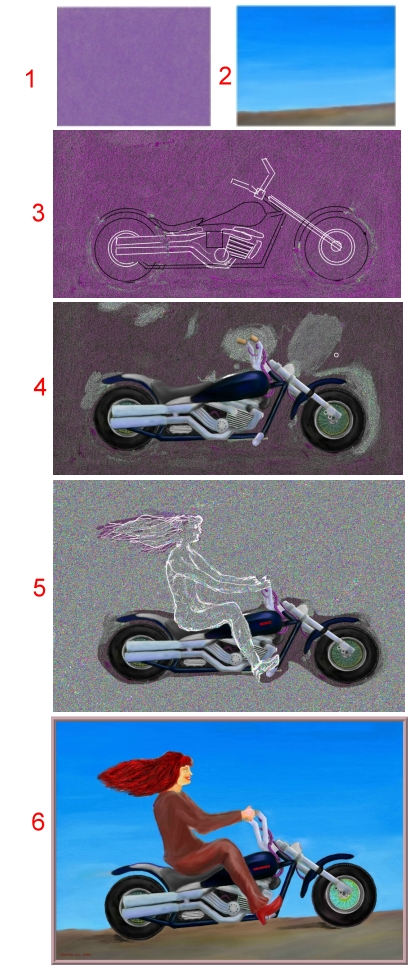
#6 Fig.10
Computer painting in a pixelfilled file
Rechnermalen in einer mit Pixeln gefüllten Datei
|
|
|
|
#8 Fig.1
Abgrenzung mit Linien. / Delimiting using lines
|
|
|
|
Zurück / Return
|
|
|
|
#9 Fig.1 Differenzbildung / Difference of Pictures
#9 Fig.2 Differenzfarben / Difference colors
|
|
|
|
|
|
#g10 Kopieren von großen
Mal-Objekten
Zum Kopieren eines Objektes aus einem Bild A, in ein Bild B, verwendet man normalerweise ein Ausschneidewerkzeug (Lasso), markiert damit den
auszuschneidenden Bereich in Bild A um Ihn zu kopieren. Wenn jedoch das Objekt sehr groß und kompliziert ist, wird das Markieren zu schwer, weil man meistens die Markierung verwackelt. Aber mit einem
einfachen Trick, schafft man es auch grösste Objekte, sauber zu markieren. In Fig.1 ist gezeigt, wie man das erreicht. Der Kopierweg ist damit folgendermaßen:
- Das gesamte Bild A in eine Arbeitsdatei AA kopieren damit diese nicht versehentlich beschädigt wird.
- Das gesamte Objekt nach der grünen Linie so ausschneiden, das ein äußerer Rand des Objektes übrig bleibt.
- Dieses Teilobjekt X im neuen Bild B abspeichern, aber nicht einfrieren.
- In Bild AA den Zoom stark aufdrehen und nun einzelne Teile des Objektes sehr sorgfältig und genau ausschneiden.
- Diese Teilobjekte nach Bild B kopieren und mit 50 % Transparenz auf das Teilobjekt X legen.
- Alle Teilobjekte zum Gesamtobjekt zusammenfügen und danach die Transparenz jeweils auf 100 % erhöhen und einfrieren. Das Teilobjekt X
muss nun verschwunden sein.
- Alle Trennstellen mit einem Wischwerkzeug (Blender) leicht nacharbeiten.
|
|
|
|
#g11Bewegungstudien mit
gemalten Bildern
Mit einem Malprogram, kann man sehr schöne Bewegungsstudien durchführen. Dazu benützen wir die Methode “Pinnocio” und zeichnen eine Person mit
einzelnen Gliedern, die Glieder kopieren wir wir aus und halten sie als Objekte bereit. In Fig.1 ist das Beispiel eines Eislaufenden Mädchens zu sehen. Um das Mädchen zu bewegen, ändern wir Lage und
Winkel der einzelnen Glieder von Fig.1-1. in die Bilder Fig.1-2-5. Ob die vorgesehenen Bewegungen richtig ist, prüfen wir in einem Animator Programm und sehen ob das Mädchen richtig auf dem Eis läuft.
Fig.2
|
|
|
#g12 “Multiply” hilft zeichnen
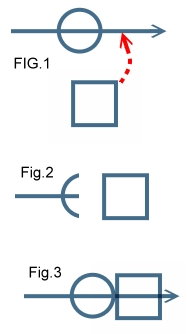
Bei Zeichnungen auf weißem Hintergrund hilft Objektbearbeitund mit “multiply” Überlagerung.Wie das hilft, zeigt das Beispiel von Fig1-3. Fig.1 sei
eine technische Zeichnung bei der ein irgendwo ausgeschnittenes Objekt eingesetzt werden soll.(roter Pfeil): Überlagert man mit “normal” oder “always” nach Fig.2 ist das Einsetzen unmöglich. Überlagert
man dagegen mit “multiply” nach Fig.3 klappt das Einsetzen des Objektes.
|
|
|
|
|
|
|
|
|
|
#10 Fig.1 Kopieren von großen Objekten /
Copy of very large objects
<<File AA
File B>>
|
|
|
#11 Fig.1 Pinnoicio methode / Pinnocio methode
#11 Fig.2 Bewegungstest / Test of motion
|
|
|
|
 #12 #12
Fig.1,2,3 “Multiply” hilft zeichnen / "Multiply" helps for drawings
|
|
|
|
|
|
|
|
|
|
|
|
|
|
|
|
|
|
|
|
 #e6 Modeling Pictures using pixels #e6 Modeling Pictures using pixels
Many computer painted pictures are to precise and look like maschine made art. To overcome this problem I have thought about it , and found the following solution: Modeling pictures using
pixel filled files. Normally, the painting file is slowly filled with pixels during painting. But now, we first fill the file totally with pixels of any
tool, except “Fill”. Then we shift this pixels to produce the picture we want. Therefor we don’t need painting pencils and so on. Yet lets look to an example using the computer program “ Corel-Painter X” at Fig.8
- #1 Fill a file with the Pixel of a drawing tool, for instance “Pastel” until no lines are visible.
- #2 Use the tool “ Sharpen” to bring the pixels to the surface.
- #3 Use a fine Eraser to draw the picture into the pixels and wipe it using a blender or something else. (the pixels can be shifted very easily)
- #4 Overwork the picture, perhaps using a color pencel.
- #5 Cut the picture
- #6 Colorize the picture and use it as an object somewhere else.
This kind of painting works at any painting program. See the example of painting a hat using “ Photo impact” at Fig.9. Here, the file is
filled using a multicolor pencil. The #2 to 13 show the way of modeling the hat.
Now we look to the example of Fig.10 a totally modeled picture. The way of painting is as follows:
- Filling of a file using an “Airbrush” and a “Sharpener”.
- Painting of the background using Oil colors ( Twisted Brush “ Textured Oil”). Painting with oil on sharpened Pixels is easy like real thick oil colors.
- Sketching of the motor cycle, using an “Eraser “ or a “Pencil”.
- Painting of the motor cycle using “Textured Oil” and a soft “ Blender”.
- Sketching of the Girl and copy as an floating Object. Changing of position angels of body, legs and arms to optimize the position of the girl on the
motorcycle.
- Copy the motorcycle and girl and merge it into the #2 Background. Repairing the edges using Oil and Blender.
|
|
|
|
Zurück / Return
|
|
|
|
#e7Darken of picture parts
To darken parts of a Picture during painting, there could be used several Methods :
- Use the tool “ BURN “ or “DARKEN “ and work with it.
- Use the Tool “ LASSO “ mark the picture part and set the tuning “brightness” back
- Use the Tool “ LASSO “ mark the picture part, copy and merge it as an multiply object or layer. Fig.1 shows an example.
- #1 The inside of the vase should be darkened.
- #2 Mark the part.
- #3 Add it as an multiply object-
- #4 Rework with a “BLENDER “ tool.
#7 Fig.1 Multiply darkens picture part
|
|
|
|
|
|
|
|
#e8 Delimiting using lines
Often arise when drawing unwanted flutter margins, which we later with an "eraser" difficulty must straighten. This work can be
saved if you straightened the edges with branded lines. This is easily and quickly. As an example, the vase of Fig.1 is shown. In # 1 You can see the ragged edge of the vase, which You
should level out at a much enlarged image. In # 2, a line with the tool "Spline" as an object on the edge of the vase was laid. In # 3, the color of the line was changed to white, and burnt the
line. Now the flutter is away.
|
|
|
|
#e9
Computer Painting using Difference Objects
Using difference objects or layers, many new art effects that are difficult to paint with a brush, can be created. To achieve this, the variables of the
difference must be tunable, especially the transparency. In this way, you can paint pictures without a pen and a brush. An example shows you how to do this. In Fig.1 #1, a simple picture of numbers of small boxes is
displayed.If we superimpose the same picture as an
differenceobject , the result is a absolutely black image. Shifting the object a little, enhances the lines, # 2. Working on #1 with a smear tool, #3 comes out. # 1 and # 3 differentially superimposed creates a new mixed picture of the new # 4. Depending on the status of the difference parameters a different mix may be created, # 5. The change of the mixparametres, is a new art of creating pictures. Working on the image # 1 using a water tool, the picture of # 6 is created. With proper choice of the differenceparameter the water picture of # 7 has been created. (The images were taken with the tool "Tonmap" of PhotoImpact 6.0.) In a
painted picture, you can change this way individual parts selectively by copying this part, modifying it, and superimpose it again. It is important to know what happens to the colors, because the RBG
color mixing laws do not apply to subtraction. That is why I have made the Difference color table for T = 0 by Fig.2. We see here that the same colors always comes as black color. An example is: White minus
blue is always yellow, green minus yellow becomes red.
|
|
|
|
#e10
Copying large painting objects
To copy an object from an image A, into an image B, one usually uses a marker (Lasso), marking the
area to be cropped in Image A to copy it. However, if the object is very large and complicated, the marking is difficult because you usually blurred the mark. But with a simple trick, you can marking clean
largest objects . In Fig.1 is shown how to achieve that. The way to copy is thus as follows:
- Copy the entire image A in a working file AA, so that A is not damaged inadvertently.
- Cut the whole object in AA along the green line so that an outer edge of the object remains.
- Store this sub-object X in the new image B , but do not freeze.
- In the AA image, zoom turn up very large now and copy out certain parts of the object very carefully and accurately.
- Copy this partial objects into B above the object X and set transparency to 50% .
- Copy this way all sub-objects to the
file B and add all sub objects together, and then increase transparency to 100% and freeze all. The sub-object X must have be gone now.
- All separation crevice with a wiping tool (Blender ) rework slightly.
|
|
|
|
#e11
Motion studies of painted Pictures
With a paint program, you can perform very beautiful motion studies. For this we use the method "Pinnocio” and draw a person with individual limbs, we
copy each limb and keep them available as objects. In Fig.1 an example of a girl skating on the ice, can be seen. To move the girl, we change position and angle of the individual limbs of Fig.1-1. to the images of
Fig.1-2,-5. Whether the proposed motion is correct, we examine in a Animator Program and see if the girl's running well on the ice. Fig.2
|
|
|
|
#e12 “Multiply” helps for drawings
At drawings on a white background object superposition "multiply" helps a lot.
How it helps shows the example of Fig1-3.
Fig.1 Is a
technical drawing. Now we insert a object which has been cut somewhere else into this drawing . (red arrow).
Superimposing using "normally" or "always"
insertion is impossible. Fig.2 On the other hand, superimposing using "multiply" insertion is possible. Fig.3
|
|
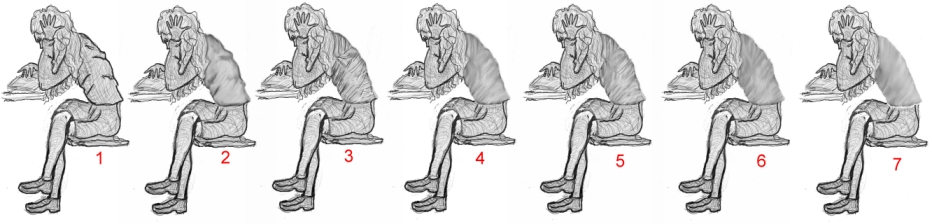


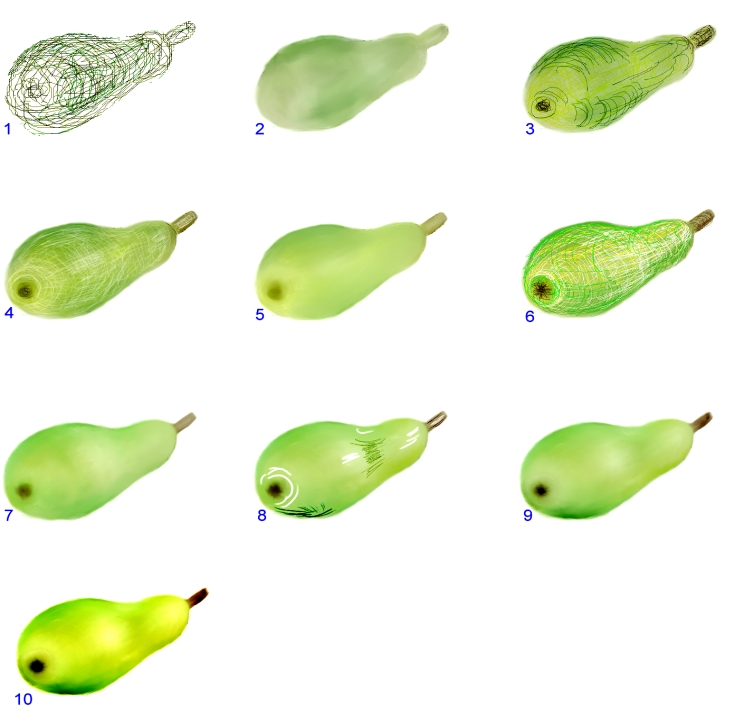
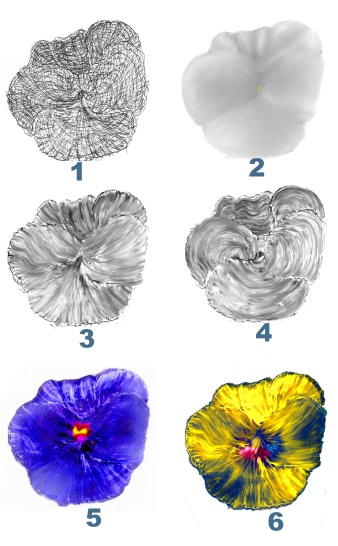
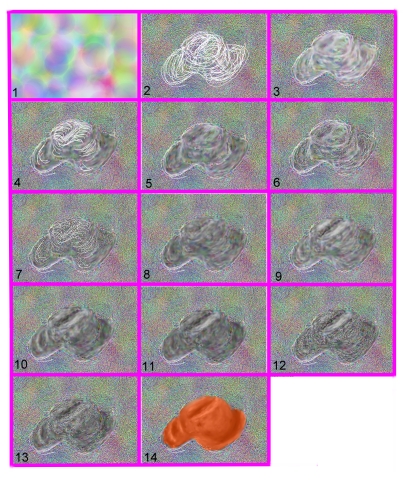
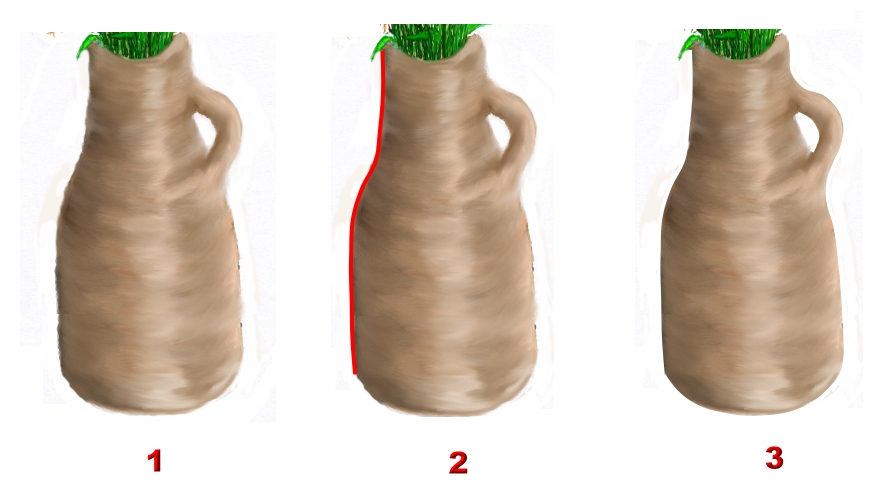
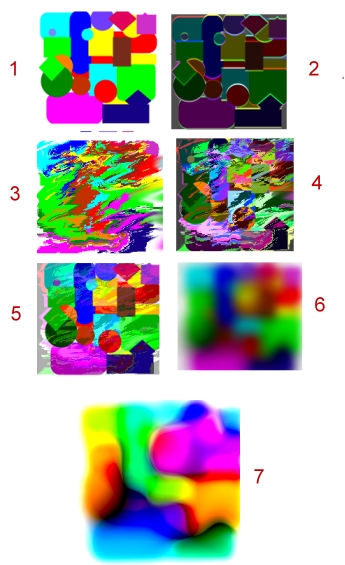
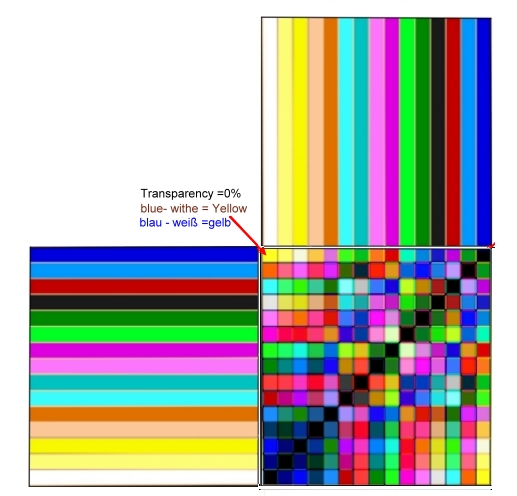
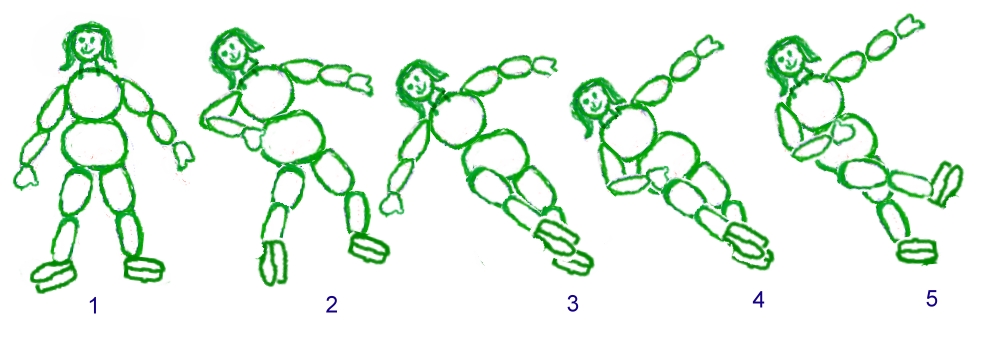
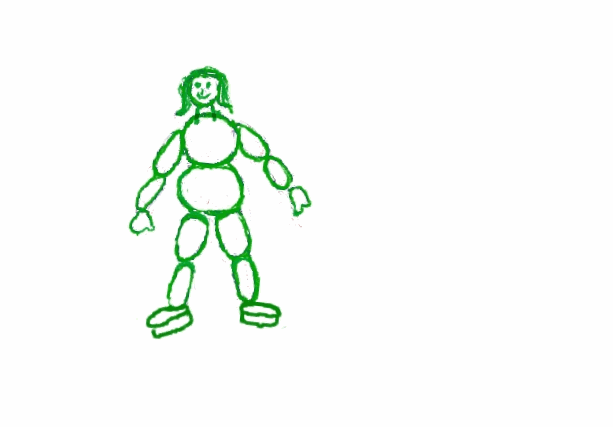

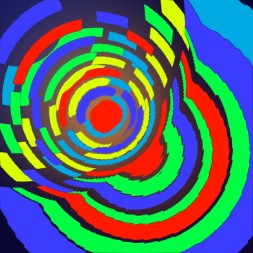
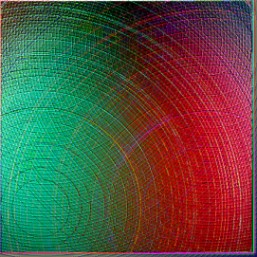
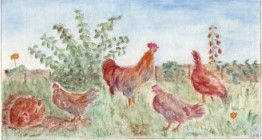 Fig.14-1 Handgemaltes Aquarell /
Handpainted aquarell
Fig.14-1 Handgemaltes Aquarell /
Handpainted aquarell
 Fig14-2